Eggless Indian Pav/Dinner Rolls
Soft and puffy, this Indian Bakery Style pav/pao buns or Dinner rolls are eggless and made with just 5 ingredients flour, yeast, milk, sugar, and butter.
Servings: 16 Pav Buns
Ingredients
- 4 cup (790 grams) Packed All-Purpose Flour/Plain Flour/ Maida (For me it comes to around 790 grams, but it can vary from 750-790 grams depending on the flour used)
- 1 packet 7 grams - 2 ½ teaspoons Fact Action Dry Yeast / Rapid Rise Yeast
- 1 teaspoon Sugar
- ¼ Cup (60 ml) Lukewarm water
- 1 ¼ teaspoon (12 grams) Salt - as per taste
- 1 ½-1 ¾ cup Luke Warm Milk (More or Less might be required depending on flour)
- 2 tablespoon milk for brushing the buns
- 2 tablespoon softened butter at room temperature
- ½ -¾ tablespoon more butter for coating the bowl and the buns
Instructions
- Blooming of yeast
- In a medium-size bowl, add in lukewarm water. The water should be lukewarm, just enough warm that you can easily dip your finger in it.
- Add yeast and sugar in the water and give it a mix.
- Cover and let it sit for 10 minutes. If your kitchen is cold, cover a wide bowl on top of it or let it sit in microwave or oven (basically in a closed location - do not switch on microwave or oven)
- Check the images below, I have purposely added the spoon to show how the yeast mixture blooms.
- If your yeast mixture has not bloomed properly the yeast is dead and you would need to work with new yeast. At times even before the expiry date it is dead. So always bloom the yeast and check before adding in the dough.
- In a wide bowl or your stand mixer sift the flour and add the salt and give everything a quick mix.
- Now in a wide bowl or your stand mixer add in the sifted flour
- Add in the bloomed yeast mixture and give everything a mix.
- Slowly add lukewarm milk. First add 1 Cup of milk and mix everything.
- Keep on adding milk ¼ cup at a time until you get a sticky dough. One should be able to add around 1 ½ - 1 ¾ cups of mil
- If you are kneading it with hand, take the dough mix on a clean kitchen working area.
- Knead this for a good 5-10 minutes until the dough comes in together.
- If using stand mixer just knead the dough using the kneading hook slowly incorporating milk.
- First on slow speed until the dough is well incorporated and then on high speed for around 5 minutes.
- Once the dough comes together, add in the butter again ½ tablespoon at a time and knead it with hand until you form an elastic dough. If you form a dent the dough should spring back in a few seconds.
- For stand mixer follow the same, by slowly adding the butter and kneading on medium speed until the dough is elastic.
- Now form a rough ball from the dough.
- Grease the bowl of a stand mixer or a wide bowl.
- Keep the bowl covered in a warm kitchen location. One can even keep the bowl in the oven/microwave with oven/microwave switched off and oven door closed.
- Let the dough rest for 75-90 minutes until double.
- Once the dough has doubled in size, pinch the dough.
- Give it a rough knead for a minute and divide it into equal size balls/buns. One can measure and divide too, I eyeball it. If measuring one bun size is around 85-90 grams.
- Arrange the buns in a baking tray lined with parchment paper or greased lightly with butter.
- Space out the buns leaving a gap in between for the pav buns to rise.
- The tray used for baking should have a bit of depth. Around 1 inch, it helps the pav to rise vertically.
- I use different tray sizes. The pic below are with tray size of 12x12 inch and 12x11 inch (Internal Dimensions). And I am adding images for all to give you an idea. Check below for images.
- If you have some leftover dough you can experiment with braiding or make different shapes of bread in another tray and just use it as a pizza base.
- Cover it with a clean muslin cloth and let it rest for 75-90 minutes until double.
- Again one can keep it on the kitchen counter or the tray in oven/microwave with oven/microwave switched off and oven door closed.
- Once the pav buns have risen, i.e. after 75 minutes preheat the oven to 200 Deg C / 392 Deg F. (Remember if you have kept the oven tray in the oven, remove the tray from the oven before starting to preheat)
- Using a pastry brush, brush the buns with a little milk. It helps to give a nice brown color on the top of the buns.
- Now, bake this in a preheated oven for 17-20 minutes.
- If you are oven is hot from behind or has uneven heating, around 10 minutes just rotate the tray. Be a bit quick so as not to escape the heat.
- Do not exceed the baking time of 20 minutes or your buns will go hard.
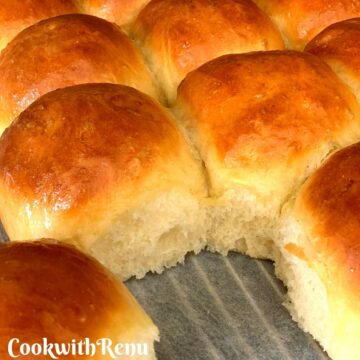
- After 20 minutes remove from oven and immediately apply butter using a pastry brush.
- After 5-10 minutes gently lift the parchment paper and let this cool on a wire rack.
- If you have not used parchment paper, just let the whole tray sit on a wire rack.
- Once cooled keep the pav buns covered with a muslin cloth. This helps them not to get dry and retain moisture.
Notes
- Temperature plays an important role in bread making.
- Water and milk should be lukewarm.
- The yeast mixture has to be bloomed using lukewarm water/milk. It has to be lukewarm and not hot or else you will kill the yeast.
- Always test the yeast first if it is getting bloomed and then only add to the flour.
- The butter has to be melted or in semi-soft form but at normal temperature. It should not be cold.
- If you are using butter or milk from the fridge it is best to let it come to room temperature or slightly warm them up. But not heat.
- The cold temperature will not let the yeast work and hot will kill it.
- While proofing the dough and the pav buns leave it to rest undisturbed. By checking in between you will release the heat trapped and you will disturb the proofing process.
- Use a wide tray and which has a dept of around 1 inch. It helps the pav buns to rise properly.
- Oven temperatures are different, so do keep an eye after 17 minutes.
- 1 Cup = 235 ml, 1 tbsp= 15 ml, 1 teaspoon = 5 ml
