How To Make Black Channa Sprouts With Muslin Cloth In Cold Weather (No Jar, No Tools)
Want fresh, crunchy sprouts but live in a cold place with no sprouting jars or fancy gear? You can still make black channa sprouts at home using nothing more than muslin cloth, a bowl, and a warm corner of your kitchen.

Black channa, or black chickpeas, are small, dark brown beans packed with protein, fiber, B vitamins, and minerals. When you sprout them, their nutrients become easier for your body to use, and they feel lighter to digest. They are budget friendly, filling, and perfect for simple salads, snacks, and breakfast bowls.
This guide is written for cold climates and slow kitchens. No special sprouting jar, no trays, no gadgets. Just basic tools you already have.
You will learn how to:
- Soak black channa the right way in cold weather
- Tie and drain them in a muslin cloth bundle
- Keep the bundle warm enough to sprout
- Rinse, care for, and store the sprouts safely
Let's set up your tiny sprout farm on the counter.
What You Need To Make Black Channa Sprouts Without Any Special Equipment
Sprouting in a cold climate feels tricky at first, but you can do it with very simple tools. The goal is to give the beans enough moisture, air, and gentle warmth, then leave them alone so they can grow.
You are not trying to build a lab. You just want a cozy mini greenhouse out of cloth and bowls.
When you sprout in cold weather, the main challenges are:
- The beans stay cold and hard for longer
- Water feels icy, so soaking takes more time
- Sprouts can sit around for 2 or 3 days before they are ready
This means you need:
- A warm enough spot
- A clean cloth that holds moisture but also breathes
- Regular rinsing so nothing turns slimy
With that in mind, let's look at what to prepare.
Choosing Good Quality Black Channa For Fast, Healthy Sprouts
Black channa is just another type of chickpea, but smaller, darker, and a bit nuttier in taste. It is often sold as black chickpeas or kala chana.
To sprout well, the beans must be:
- Whole: No split channa, no dal, no broken pieces
- Clean and unpolished: A natural, slightly dull surface is better than shiny coated beans
- Free from insects and damage: No holes, no powdery bits, no strange smell
Old or very dry beans may still sprout, but they take longer and sometimes stay hard. If your past bags have taken forever to cook, they may also sprout slowly.
A simple buying tip: pick a trusted brand or a store with good turnover, such as a busy local grocery or Indian store. Fresh stock usually sprouts faster.
For one small batch, start with:
- ½ to 1 cup of dry black channa
This amount will swell up a lot once soaked and sprouted, so it is enough for a small family to snack on for a couple of days.
Basic Tools: Muslin Cloth and a Bowl
You do not need jars or special sprouting stands. Just gather:
- Muslin cloth or thin cotton cloth: Clean, white or light colored, with no strong detergent smell
- One or two regular bowls: Any medium-sized kitchen bowls
Muslin is perfect, since it is:
- Breathable: Air can move around the beans
- Good at draining: Excess water drips out
- Moisture holding: It stays slightly damp, which keeps the beans happy
If you do not have muslin, any clean, thin cotton napkin or old soft cotton dupatta piece will work, as long as it is washed well and not too thick.

Keeping Things Clean And Safe Before You Start Sprouting
Sprouting is simple, but it is also a warm, moist process. That is the same environment germs like, so basic hygiene matters.
You do not need to panic about it. Just keep things clean and fresh.
Before you start:
- Wash your hands with soap and warm water
- Rinse the bowls with hot water and a little dish soap, then rinse well
- Wash the cloth with mild soap, rinse well, and let it dry
If you feel worried about germs, you can:
- Boil the muslin cloth in plain water for 5 minutes
- Squeeze it out and let it air dry completely.
Next, rinse the dry black channa under running water and remove any stones, broken pieces, or dirt. This small step helps the whole process feel safer and cleaner, especially when sprouts will sit for up to 3 days in a cold home.
Step By Step: How To Make Black Channa Sprouts In Cold Climate Using Only Muslin Cloth
Once everything is clean, you can move through the sprouting steps. Cold weather only changes three things: water to soak, and how long you sprout, and where you keep the bundle.
Step 1: Rinse And Soak Black Channa For The Right Amount Of Time
- Measure your dry channa, about ½ to 1 cup.
- Spread it on a plate and pick out stones or damaged beans.
- Rinse in a bowl under running water until the water is mostly clear.
Now you soak:
- Put the channa in a bowl and cover with lukewarm water. This is the key here, especially if you have cold weather. In normal weather, you can use normal fresh tap water.
- Use at least 3 times the volume of water, since the beans will swell
- Use room temperature or slightly warm water, not hot
In a cold climate, the beans feel harder, and the water stays cold. So, a short soak does not work well.
Aim for:
- 10 to 12 hours of soaking, often overnight
Never use boiling or very hot water. It can damage the beans and stop them from sprouting.
Step 2: Drain Well And Wrap The Channa In A Muslin Cloth Bundle
After soaking, the channa will look bigger and softer to the touch.
Now:
- Drain the water completely using a colander, or by holding the channa back with your hand and tilting the bowl.
- Shake the colander or let the beans sit for a few minutes so extra water drips out.
The beans should be moist but not swimming in water.
Lay your clean muslin cloth on the counter and:
- Place the drained channa in the center
- Fold the cloth from all sides to make a pouch
- Tie the top with string or a rubber band, or twist the corners together
- If your cloth is very thin, make a double layer or one can even use a clean, thin towel.
Keep the bundle loose enough so air can move and the sprouts have room to grow. If it is tied too tight, the beans may smell bad or crush each other.
Step 3: Spot - do we need a warm spoot? Light or Dark? In Cold Weather
Now I always just keep it wrapped in a bowl, on my kitchen counter near my window. Where it receives little night. My kitchen is cold as it has tiles, and even with the heater on, the kitchen is freezing or quite cold. Secondly, it gets light for 6-7 hours, and the rest time it is anyways dark or just in a tubelight.
However, it is said, to put it in a warm place like (I have not done any of the below 4 points, but just letting you know what others follow at times)
- Inside the oven with the light on, but power off
- Near a warm stove after cooking, but not on hot metal
- On top of the fridge, where it is usually slightly warm
- Wrapped in a clean towel and kept in a cupboard away from cold drafts
The ideal temperature feels comfortably warm to your hand, not hot. If it feels like a warm room or a cozy sweater, that is perfect.
Step 4: Rinse, Drain, And Rewrap Every 24 Hours For Fresh, Crisp Sprouts
To keep sprouts fresh, give them a gentle rinse every 24 hours.
Here is how:
- Open the cloth bundle over a bowl.
- Rinse the channa under cool or slightly warm water or simply sprinkle the channa with water.
- Drain very well, so water is not collecting at the bottom.
- Wrap again in the same cloth if it still feels clean, or in a fresh one.
In very cold weather, black channa may take:
- 24 to 48 hours or more to show clear sprouts
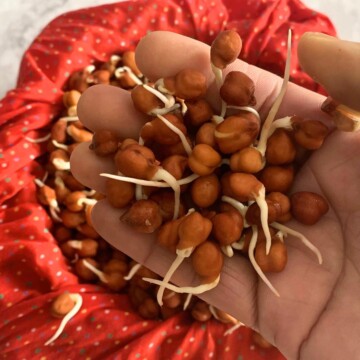
The first sign of success is tiny white tips coming out of the beans. Short tails give a mild taste and are easier to digest. If you like longer tails, give them another 12 to 24 hours, still rinsing every 24 hours.
Step 5: Know When Black Channa Sprouts Are Ready And How To Store Them
Finished black channa sprouts look:
- Swollen and firm, not wrinkled
- With clear white tails
- Slightly crunchy, with a fresh, nutty smell
In a cold climate, they usually need about 3 to 4 days from soaking to reach this stage, depending on how warm your spot is. Never go beyond 4 days, they might go bad.
Once they are ready:
- Place the sprouts in a clean, dry container with a lid
- Store in the fridge for 2 to 3 days
- Rinse before eating
If any sprouts smell sour, feel slimy, or look gray or mushy, throw them away. Fresh sprouts should smell clean, like raw nuts or peas.

Cold Climate Troubleshooting And Easy Ways To Use Your Black Channa Sprouts
Sometimes sprouts act stubborn, especially when the weather is chilly. A few small changes usually fix things.
Sprouts Not Growing In Cold Weather: Common Problems And Quick Fixes
Here are some common issues and simple fixes:
- Very slow or no white tails: The spot is too cold. Move the bundle to a warmer place, such as closer to the stove after cooking or inside the oven. Do not put the light on, as I believe it might damage the sprouts.
- Sprouts smell bad: They are too wet or crowded. Rinse well, drain more, and spread into two smaller bundles instead of one large one.
- Beans feel dry and hard: The cloth dried out. Use a slightly damp cloth and check more often. You can sprinkle a spoon of water on the bundle if it feels dry.
- Only a few beans sprout: The channa may be too old, or soaking time was too short or too long. Next time, use fresher beans and stick to 10 to 12 hours of soaking.
If you try all this and they still do not sprout well, switch to a new bag of black channa and test a small batch first.
Tasty And Simple Ways To Eat Black Channa Sprouts Every Day
Once you have a bowl of fresh sprouts, you can use them in many easy ways that match the no equipment style.
Some ideas:
- Add a handful to salads for extra crunch
- Mix with chopped onion, tomato, cilantro, lemon juice, salt, and chili for a quick street style snack. Like in this Oil-Free Chickpea Salad.
- Stir into warm soups or curries right at the end, so they stay a bit crunchy
- Use in sandwiches or wraps with vegetables and yogurt
- Toss with boiled potatoes, spices, and a squeeze of lime for a filling breakfast
- Make pattice like in this one.
- Use in Curry's
- Make Pulao.
If you are new to sprouts, start with a small amount and chew well. Sprouts are rich in fiber and can feel heavy if you eat a large bowl at once.
Use them within 2 or 3 days for the best taste and nutrition.

How to Make Black Channa Sprouts using Muslin Cloth in cold climate.
 Print
Pin
Rate
Save
Cook Mode
Share Recipe
Print
Pin
Rate
Save
Cook Mode
Share Recipe
Equipment
- Colander - Optional
Ingredients
- 1 Cup Black Chickpeas Kala Channa
- 3-4 cup Water
- Clean Muslin Cloth or any clean Kitchen Towel
Instructions
Day 1
- Clean and rinse the Black Channa in clean tap water, 3-4 times.1 Cup Black Chickpeas
- Soak it in a clean tap or lukewarm water for8-9 hours or overnight.
- Water should be 3-4 times more than the Black Chana.
- If you are living in a cold climate, soak them in lukewarm water. It helps soak the beans well and even sprout3-4 cup Water
Day 2
- Once the Black Chana are soaked for 8-9 hours or overnight, discard the water.
- At times, if you have added less water, all the Black Chana might not have soaked properly.
- In this case add more water and let it soak further for 2-3 hours.
- The soaked water might appear slightly discolored as seen below. Do not worry it's not gone bad. It's a natural process.
- Rinse the Black Chickpeas again in clean tap water.
- Take a clean muslin cloth or a kitchen towel.Clean Muslin Cloth or any clean Kitchen Towel
- Keep the clean cloth over a strainer or colander.
- Now add the Black Chana to it, discarding any water.
- Give a rinse again to the Black Chana.
- Cover the Black beans with the cloth. (Grab the edges of the cloth and give it a twist on the top to loosely close it like forming a potli or a parcel.)
- Keep this aside in a clean dry place.
Day 2
- You might have a few sprouts appearing on the black chana.
- Open and rinse gently it or sprinkle it with water and cover again.
Day 3
- Check if your Black beans are sprouted. In hot climate, it sprouts fast.
- If not, just sprinkle some water, or rinse gently, cover it, and keep it aside again.
Day 4
- The Black Chana should sprout on this day. If not, there is a problem, and chances are that the beans have gone bad.
- At this point I use or freeze the sprouts as required.
Using Sprouts
- When using sprouts in any recipe, give them a quick rinse.
- If not using right away, do not rinse and store it in a clean and sterile air-tight container or zip lock in the refrigerator for 3-4 days and use as required.
- If storing in the freezer, do not rinse and store in a clean and sterile air-tight container or zip lock in the freezer for up to 3 months and use as required.
Notes
- Read above for tips and tricks on how to sprout and to sprout in cold climates.
Tried this recipe? Please comment and rate the recipe. Share your pics and tag us.
Subscribe to my email list to get the new recipes straight into your mailbox.