
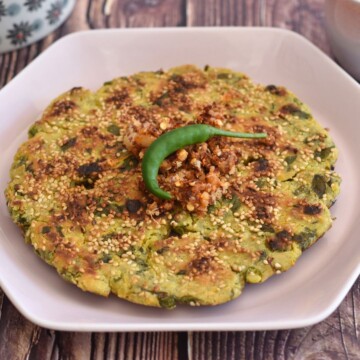
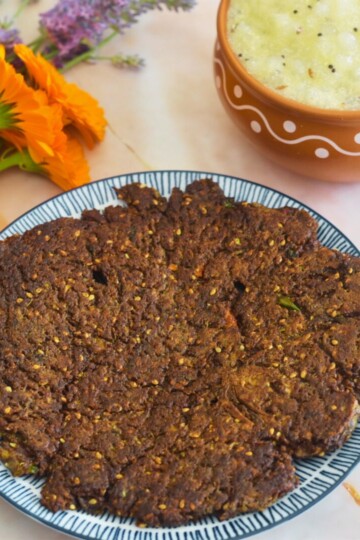
Beet Greens Jowar Thalipeeth
Looking for a truly wholesome flatbread that's far more than just a meal? Beet Greens Jowar Thalipeeth brings together the rustic roots of Maharashtra with a fresh, modern twist. Using bright beet greens,fresh veggies, nutty jowar flour, and simple Indian spices, this gluten-free thalipeeth offers big flavor and an impressive nutrition boost.

Jowar makes this thalipeeth gluten-free, and the veggies give it an extra boost of fiber and nutrition. Each slice is wholesome, filling, and perfect for anyone looking to eat cleaner without giving up on taste.
If you're after a nutritious Indian bread that breaks the routine, this thalipeeth has you covered. It's a smart choice for breakfast, lunch, or even a snack-and it's just as easy to make as it is to enjoy.
- The Heritage of Thalipeeth: Explore the origins of Thalipeeth as a Maharashtrian staple and its cultural role
- Key points about traditional thalipeeth:
- Why I made Beet Greens Jowar Thalipeeth?
- Step-by-Step Recipe for Beet Greens Jowar Thalipeeth
- Making the Dough and Perfecting the Texture
- Serving and Pairing Suggestions
- Tips for Making and Storing Beet Greens Jowar Thalipeeth
- Beet Greens Jowar Thalipeeth
- Sharing this with
The Heritage of Thalipeeth: Explore the origins of Thalipeeth as a Maharashtrian staple and its cultural role
Thalipeeth basically is a flatbread, which has its roots in rural Maharashtra, where home cooks have relied on this savory flatbread for generations. Traditionally, families made thalipeeth from a multi-grain flour blend called "bhajani." The mix often included roasted lentils, wheat, and millets, turning simple ingredients into a powerhouse meal.
Thalipeeth isn't just everyday fare; it's comfort food that shows up at breakfast, lunch, or even as a quick snack. Women often whip it up using what's on hand-greens, leftover vegetables, or even just onions. The dough is shaped by hand, making it rustic and inviting. Sharing thalipeeth around the table is as much about family as it is about flavor.
It's a complete meal, loaded with fiber, plant protein, and earthy flavors. It worked its way into every festival, fasting day, and lazy weekend.
Key points about traditional thalipeeth:
- Made with a mix of grains and pulses
- Easily customized with local vegetables or herbs
- Popular for its satiating nature and robust taste
- It's filling: Fibrous flours and veggies leave you full and happy.
- It's quick: From mixing to cooking, it fits busy mornings.
- It's community-driven: Passed down from elders, every family has its touch.
Beyond the kitchen, thalipeeth represents self-sufficiency and respect for seasonal produce.
Traditional vs. Modern Variations
Thalipeeth has evolved, yet its spirit remains the same-simple, adaptable, and nourishing. While the classic version blends millet or wheat flours, cumin, and chopped onions, today's cooks get creative with what goes inside. Recipe here for the traditional Thalipeeth, though Instant.
Traditional Thalipeeth:
- Bases include a blend of jowar, bajra, rice, and wheat flours.
- Flavored with cumin, coriander seeds, sesame, and fresh onions or greens.
- Usually served hot with homemade butter, yogurt, or a tangy pickle.
Modern Twists:
- Innovative cooks add grated vegetables like carrots, spinach, or beet greens.
- Gluten-free versions swap wheat for more jowar or other millets.
- Nutrient-rich add-ins, like flaxseed or amaranth flours, boost health benefits.
The Beet Greens Carrot Jowar Thalipeeth is a perfect example of this new wave. It keeps the soul of thalipeeth alive but pushes nutrition and color further. The earthiness of jowar lets the sweetness of carrot and the boldness of beet greens shine. The result? A flatbread that's as eye-catching as it is good for you.
Why I made Beet Greens Jowar Thalipeeth?
I had fresh beet growing in my garden. It grew over the winters and I had it ready for spring or early summer. I like to use the Beet Greens as it is one of the good source of Iron and loaded with essential nutrients.
I added fresh grated carrot as I had it in hand. If you add fresh Beetroot instead of carrot it imparts a lovely pink colour to the thalipeeth. Basically as said earlier, one can add any fresh veggies. I add whateve is available in my kitchen.

Step-by-Step Recipe for Beet Greens Jowar Thalipeeth
Essential Ingredients & Substitutions
Key Ingredients:
- Jowar flour (sorghum): The star of this gluten-free flatbread.
- Beet greens: Use fresh, tender leaves with stems removed and finely chopped.
- Onion: Adds sweetness and moisture.
- Carrot: Adds moisture and
- Green chili: For kick (use less or omit for mild).
- Garlic and ginger: Freshly grated boosts flavor.
- Fresh coriander: Chopped for brightness. - I have not used in this recipe
- Cumin and coriander powder: earthy taste. - I have not used in this recipe
- Turmeric powder: For color and gentle flavor.
- Red chili powder: Optional, for extra heat.
- Yogurt/Curd: For binding and soft thalipeeth.
- Salt.
- Oil or ghee: For crisp edges and flavor.
Substitution Tips:
- Jowar flour: Millet or bajra flour work if jowar isn't available.
- Beet greens: Swap with spinach, amaranth, or kale for similar nutrition.
- Onion: Shallots or leeks give a lighter flavor.
Making the Dough and Perfecting the Texture
Mixing your dough right is the secret to thalipeeth that's both tender and crisp. Follow these steps for great texture every time.
Steps for Perfect Dough:
- Combine dry ingredients: In a large bowl, mix your jowar flour, spices, and salt.
- Add chopped veggies: Toss in beet greens, carrot, onion, green chili, coriander, and ginger-garlic.
- Add yougurt/curd and mix it gently.
- Slowly mix the dough by pressing the veggies against the vegetables so that it releases the water.
- Make a soft, pliable dough. It should feel moist but not sticky. If require add water a tablespoon at a time.
- Rest the dough: Let it rest for 10 minutes. The flour absorbs moisture and the mix becomes easier to handle.
- Divide the dough: Form small balls. You're ready to press them into flat rounds.
Texture Tips:
- If the dough feels dry, add water by the tablespoon.
- If it's sticky, dust your hands with more jowar flour.
- Don't knead like wheat dough-just bring everything together gently.
- Extra beet greens can release moisture; adjust flour if dough gets too soft.
This hands-on approach gets the best results-no tools needed, just your palms.
Traditional and Modern Cooking Methods
Cooking thalipeeth is part flavor, part texture. Here's how to get it right whether you're using a pan or trying a modern twist.
Pan-Cooking on the Stovetop:
- Pressing the thalipeeth: Wet your hands, flatten each dough ball on a plastic sheet or parchment, or a clean kitchen cloth, aiming for a ¼-inch thickness.
- Pressing the thalipeeth directly on a hot skillet: Heat a nonstick or cast iron skillet. Wet your hands. Drizzle some oil and sesame seeds. Take a portion of the dough and flatten between your hands. Now directly press this on the hot skillet.
- Cook on hot skillet: Heat a nonstick or cast iron skillet. Wet your hands. Place the shaped dough onto the skillet, pressing gently.
- Cook and flip: Cook over medium heat for 2-3 mins. Drizzle oil around the edges, flip, and press gently. Cook until both sides are golden and a little crisp.
Tips for Pan-Fried Crispness:
- Cook on medium heat. The cooking has to be even and on slow for it to cook all over.
- Press tiny holes in the center with your finger before cooking; this lets steam escape and gives a nice crunch.
Flavor Tips:
- Use ghee for richness, or olive oil for a lighter, modern touch.
- Add toasted sesame seeds or crushed peanuts for a nutty edge.
Serving and Pairing Suggestions
Perfect Sides: Chutneys, Yogurt, and More
The right side dish can change the whole taste experience. Here are some classic and creative options that pair beautifully with Beet Greens Jowar Thalipeeth:
Traditional Choices
- Homemade Curd (Yogurt): Cool, creamy yogurt balances the warmth of the spices and gives a fresh contrast.
- Green Coriander Chutney: A zesty blend of coriander, green chilies, garlic, and lemon makes every bite pop.
- Coconut Chutney: For a touch of sweetness and subtle heat, go for coconut chutney (especially good if you're serving thalipeeth for breakfast).
- Spicy Garlic Chutney: For that extra kick and flavour.
- Mango or Lemon Pickle: Pickles add sharp, tangy notes that lift the earthy flavor of the flatbread.
- Instant Green Chili Pickle - Though not a Maharashtrian recipe, this goes well with Thalipeeth.

Best Time to Serve Beet Greens Jowar Thalipeeth
Beet Greens Jowar Thalipeeth is one of those recipes that fit wherever you need them. Here are some of the best times and ways to serve this nutritious flatbread:
- Breakfast: Pair hot thalipeeth with yogurt or chai for a filling start. They hold up well even after cooling, so they're perfect for busy mornings.
- Snacks or Tea-time: Their hearty texture and flavor make them great for snacking. Slice into triangles and serve with chutney or pickles for company or afternoon hunger.
- Lunchbox: Kids (and adults) love them in packed lunches. They travel well, don't dry out, and taste great at room temperature. Add a small container of chutney or raita for dipping.
- Festive or Family Meals: Pile them into a bread basket for sharing at a party or special occasion. Serve alongside a curry, dal, or a vegetable stir fry to turn them into a main course.
- Busy Weeknights: Make extra and refrigerate-they reheat nicely in a pan and make a quick, wholesome dinner when paired with a soup or spiced yogurt.
Tips for Making and Storing Beet Greens Jowar Thalipeeth
Getting Beet Greens Jowar Thalipeeth right can be simple if you know what to watch out for. Mistakes with moisture, resting time, or storage can change the final result more than you think. With the right tips, you can easily prepare these wholesome flatbreads ahead and keep leftovers fresh for days.
Common Mistakes and How to Avoid Them
Making thalipeeth sounds easy, but a few small missteps can turn chewy or crumbly. Here's what commonly goes wrong and how to fix it:
- Dough too sticky or too dry
- This is a frequent issue. If your dough turns sticky, add a bit more jowar flour, a tablespoon at a time. If it's dry and cracks while shaping, sprinkle in extra water-just enough to make it smooth and soft.
- Under-seasoning the dough
- Skipping the dough resting step
- Let the dough rest for 10 minutes before shaping. This gives the jowar flour time to absorb water and work with the beet greens' moisture. Rushing this step can make your thalipeeth uneven or hard.
- Overloading on beet greens
- Too many greens make the dough loose and tricky to handle. Stick to the recipe's amount. If your greens are extra juicy, pat them dry before chopping.
- Cooking on high heat
- Medium heat is best. High heat burns the outside while keeping the middle raw. Always let your skillet warm up, then cook slowly for an even, golden finish.
- Forgetting to make steam holes
- Don't skip poking small holes in the center with your finger before placing the thalipeeth on the pan. These let steam out and help the bread cook through, with crisp edges.
If you mess up, don't toss the batch! Most mishaps can be fixed by adjusting moisture or heat as you go.
Storage, Reheating, and Make-Ahead Advice
Life's busy, and making thalipeeth ahead can be a real time-saver. Here's how to keep them tasting great, even when you're not eating them fresh off the pan:
- Short-Term Storage (up to 2 days):
- Let thalipeeth cool completely before storing. Place in an airtight container, using parchment or clean kitchen towels between layers so they don't stick.
- Store in the fridge, not at room temperature. Jowar flour can get soggy if left out too long, especially in humid weather.
- Freezing for Later:
- Stack cooled thalipeeth with parchment between each one, then tightly wrap them in foil or freezer bags.
- They keep well for up to a month. Thaw in the fridge or on the counter before reheating.
- Reheating Tips:
- Prefer a skillet or tawa over the microwave. Place the flatbread directly on a hot pan, and toast for 1-2 minutes each side. This brings back the crisp edges and softness inside.
- If you must use a microwave, cover the thalipeeth with a damp paper towel to keep it from drying out. Microwave in short bursts.
- Make-Ahead Dough:
- I do not recommend making the dough ahead in time as the veggies will release water and it would be difficult to handle the dough.
- Packing for On-the-Go:
- Wrap each thalipeeth in clean muslin cloth for lunchboxes. Include a small container of chutney or yogurt for dipping.
With these tips, you can enjoy Beet Greens Jowar Thalipeeth fresh, hot, or on-the-run while keeping every bite just as appealing as the first.

Beet Greens Jowar Thalipeeth
 Print
Pin
Rate
Save
Cook Mode
Share Recipe
Print
Pin
Rate
Save
Cook Mode
Share Recipe
Equipment
- Sizzler Plate / Cast Iron Griddle / Grill Pan
Ingredients
- 1 Cup Jowar Flour Sorghum Flour
- 1 Cup Beetroot greens chopped
- ½ Cup carrot grated
- ½ cup onion chopped
- 2-3 green chilies chopped
- 1 large clove garlic grated, about a tablespoon
- ¼ inch ginger grated, about a tablespoon
- 2 tablespoon Yogurt
- Salt to taste
- Oil or Ghee for Shallow Frying
- 2-3 tablespoon Sesame seeds
Instructions
- In a large bowl add in the Jowar Flour, chopped beet greens, carrot, onion, chilies, garlic, ginger, 1 teaspoon sesame seeds, salt and yogurt.1 Cup Jowar Flour, 1 Cup Beetroot greens, ½ Cup carrot, ½ cup onion, 2-3 green chilies, 1 large clove garlic, ¼ inch ginger, 2 tablespoon Yogurt, Salt, 2-3 tablespoon Sesame seeds
- Mix everything by pressing the veggies against your hands so that the vegetables release the water.
- Make a soft, pliable dough. It should feel moist but not sticky. If require add water a tablespoon at a time.
- Rest the dough: Let it rest for 10 minutes. The flour absorbs moisture and the mix becomes easier to handle.
- Divide the dough: Form small balls. You're ready to press them into flat rounds.
Pan-Cooking on the Stovetop:
Pressing the thalipeeth:
- Wet your hands, flatten each dough ball on a plastic sheet or parchment, or a clean kitchen cloth, aiming for a ¼-inch thickness.
- Sprinkle some sesame seeds on top and press it with your hand.2-3 tablespoon Sesame seeds
- Press tiny holes in the thalipeeth.
- Heat a nonstick or cast iron skillet.
- Spread some oil or ghee on it. Wet your hands.Oil or Ghee
- Cook and flip: Cook over medium heat for 2-3 mins. Drizzle oil around the edges, flip, and press gently. Cook until both sides are golden and a little crisp.
Pressing the thalipeeth directly on a hot skillet:
- Heat a nonstick or cast iron skillet.
- Wet your hands. Drizzle some oil and sesame seeds.2-3 tablespoon Sesame seeds
- Spread some oil or ghee on it. Wet your hands.Oil or Ghee
- Take a portion of the dough and flatten between your hands.
- Sprinkle some sesame seeds on it.2-3 tablespoon Sesame seeds
- Now directly press this on the hot skillet.
- Top it up with more sesame seeds and press evenly.
- Press tiny holes in the thalipeeth.
- Cook and flip: Cook over medium heat for 2-3 mins. Drizzle oil around the edges, flip, and press gently. Cook until both sides are golden and a little crisp.
Video
Notes
-Cook on medium heat. The cooking has to be even and on slow for it to cook all over.
-Press tiny holes in the center with your finger before cooking; this lets steam escape and gives a nice crunch.
Flavor Tips:
Use ghee for richness, or olive oil for a lighter, modern touch.
Add toasted sesame seeds or crushed peanuts for a nutty edge.
Texture Tips:
If the dough feels dry, add water by the tablespoon.
If it's sticky, dust your hands with more jowar flour.
Don't knead like wheat dough-just bring everything together gently.
Extra beet greens can release moisture; adjust flour if dough gets too soft. This hands-on approach gets the best results—no tools needed, just your palms.
Sharing this with
Sunday Funday where the theme for this month is Country Cooking hosted by Wendy Klik. One can read more about Country Cooking can be read here. I thought this Beet Greens Jowar Thalipeeth is an apt post for this theme.
Check out what my friends cooked for this theme
- Karen's Kitchen Stories: Amish Country Casserole
- Cook with Renu: Beet Greens Jowar Thalipeeth
- Food Lust People Love: Crispy Iron Skillet Chicken Thighs
- Palatable Pastime: Grandmother's Country Green Beans
- A Day in the Life on the Farm: Macaroni Ranch Salad
- Amy's Cooking Adventures: Shoofly Pie (Amish Molasses Pie)
- Mayuri's Jikoni: Southern Tomato Sandwich
- Sneha's Recipe : Stuffed Chicken Drumsticks In Saucy Tomato Gravy
Tried this recipe? Please comment and rate the recipe. Share your pics and tag us.
Subscribe to my email list to get the new recipes straight into your mailbox.


This sounds delicious and nutritious. Thanks so much for sharing Country Cooking from your culture.
I love the sesame seeds added for crunch.
What a wholesome flatbread, so full of veggies and protein from the flour!
So interesting! And I am always happy to collect more recipes for sorghum flour! Thanks for sharing.
Glad you could get one more.
I am a huge fan of thalipeeths. Like to make them with different flours, lentils and veggies. Like this one with beet greens. With beetroot the thalipeeth looks so pretty and inviting.
Such healthy and gluten free breakfast, love it!
This looks delicious and hearty!