
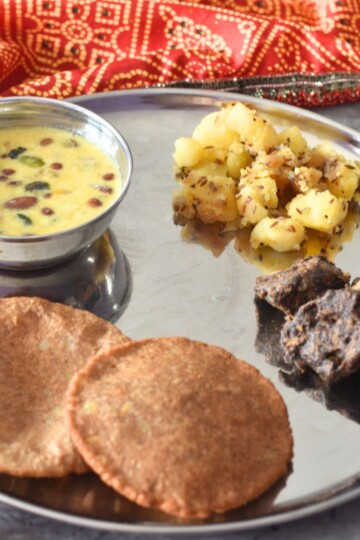
Sabudana Thalipeeth (Vrat) Crispy Outside, Soft Inside
If you've ever tried making sabudana thalipeeth and ended up with patties that crack, stick, or fall apart, this method will feel like a relief. The goal is simple: a thalipeeth that turns golden and crisp on the outside, stays soft inside, and flips without stress.
This post walks you through the small details that make the big difference, like how much water to use while soaking, how to check if the mixture will bind, and why that little hole in the center matters. It also includes a quick singdane (peanut) raita that tastes perfect with hot thalipeeth, especially on fasting days.
Ingredients for Sabudana Thalipeeth and Singdane Raita
This recipe uses common fasting ingredients (vrat or upvas-friendly), so you don't need anything complicated. The thalipeeth gets its structure from properly soaked sabudana and mashed potato, while roasted peanuts add flavor and help with binding. The raita stays thick and cooling, with the same roasted peanut taste running through it, so everything feels cohesive on the plate.
Before you start, plan ahead for soaking. The sabudana needs a few hours (or overnight), and that single step decides whether your thalipeeth stays together later.
Step-by-step: Soaking sabudana so it doesn't turn sticky or dry
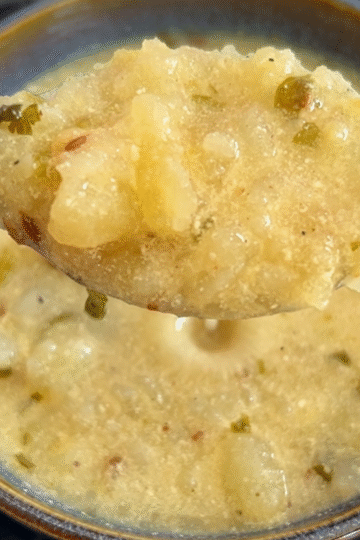
Sabudana can be tricky because both extremes cause problems. Too much water and the pearls turn sticky and gummy, then the mixture feels wet and hard to shape. Too little water and the center stays hard, which makes the patty crack when you press it.
The fix is controlled soaking. You want sabudana that's swollen and tender, with separate grains that don't feel watery.
- Measure 1 cup sabudana, then rinse it in 2 to 3 changes of water. While rinsing, rub it gently between your fingers, then drain completely each time.
- After the final drain, soak it with just enough water to help it puff up. For 1 cup sabudana, use about a little more than ¼ cup water. The water should form a thin line just above the sabudana, not a deep layer.
- Cover and rest for 5 to 6 hours, or soak overnight.
- Check the result before mixing. The pearls should look plump and expanded. When you press one, it should feel soft, not chalky in the center.
The "right water" soak is the easiest way to stop thalipeeth from breaking later. A thin water line above the sabudana is enough.
Once the sabudana is ready, the rest moves quickly. Keep your boiled potatoes ready, roast and crush the peanuts, and you'll be shaping thalipeeth within minutes.
Mixing the thalipeeth mixture (and a quick binding test)
A good sabudana thalipeeth mixture should feel like a soft dough, not like loose pearls. That's why the potatoes matter. They act like the glue that holds everything together, while the roasted peanut powder adds body and keeps the texture pleasant.
Start by mashing the boiled potatoes until they're smooth. Don't leave chunks behind because larger pieces create weak spots. When you press the thalipeeth flat, those spots often cause cracks.
Add the soaked sabudana to the mashed potatoes, then mix in the coarsely ground roasted peanuts. Season with sendha namak (or regular salt if it fits your fasting rules), add finely chopped green chilies, a little coriander (optional), a bit of sugar, and lemon juice. The sugar isn't for sweetness, it simply rounds off the taste so the peanuts and chili don't feel sharp.
Now mix well, using your hand if possible, until the potato and sabudana look evenly combined. The mixture should stop looking "separate" and start behaving like one mass.
Here's the simplest check before you heat the pan: pick up some mixture and press it into a ball. It should form easily and hold its shape.
If it doesn't bind, there are two likely reasons:
- The sabudana didn't soak well enough, so it stays dry and won't hold.
- The potato quantity is low for the amount of sabudana, so the mixture lacks a binder.
Once it passes the ball test, let the mixture rest for about 5 minutes. That short break helps everything settle, and it's a good time to prep the raita.
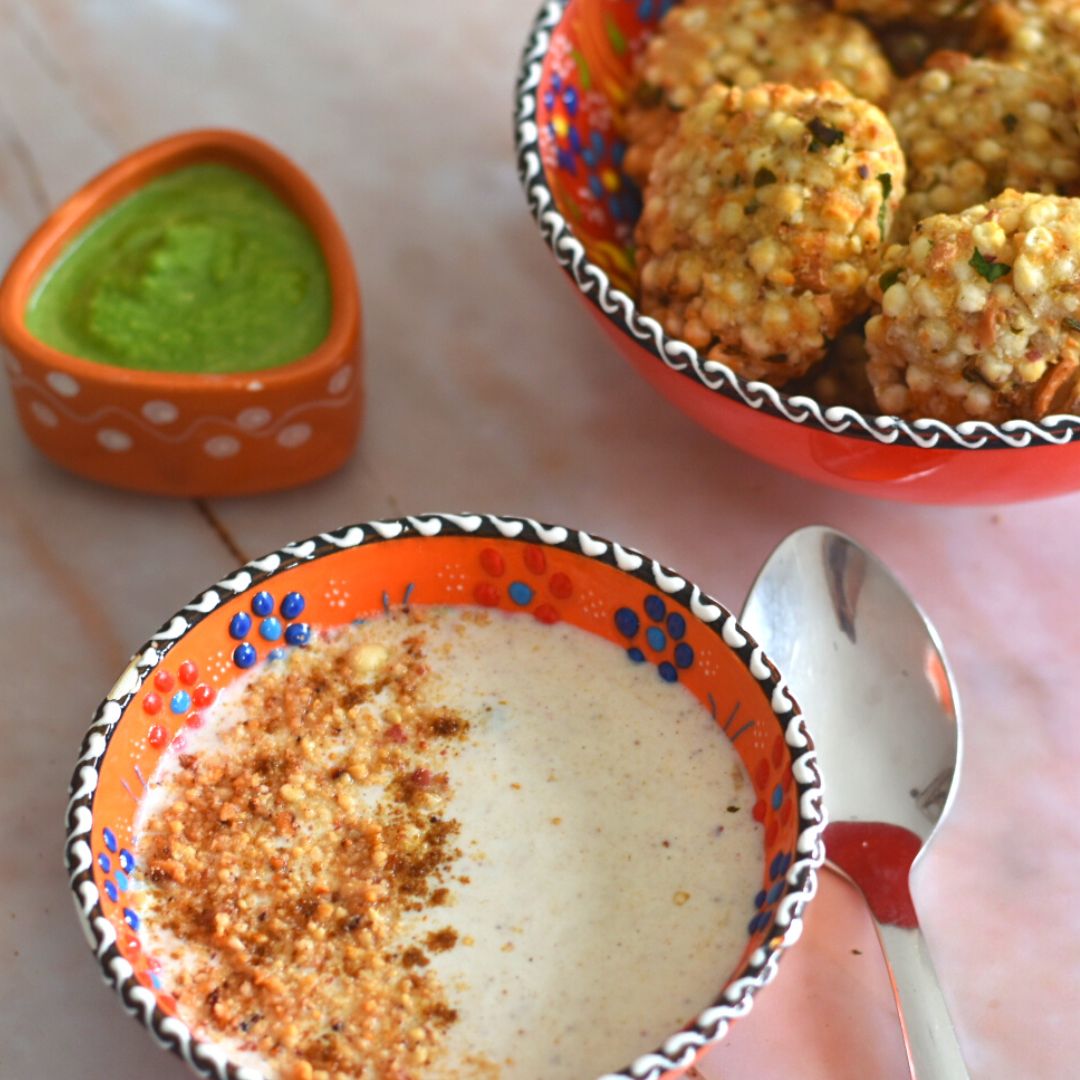
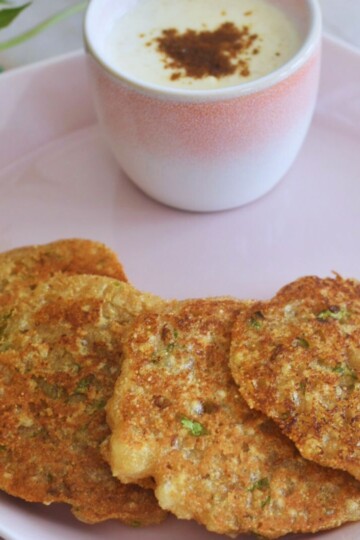
Thick singdane raita that pairs perfectly with hot thalipeeth
This raita is simple, but it makes the plate feel complete. The thalipeeth is warm and crisp, while the raita is cool and creamy. Because it uses roasted peanuts too, the flavors match instead of competing.
Use thick curd for best results. If you have time, chill it briefly so it feels extra refreshing when served with hot thalipeeth. For a dedicated version, you can also follow this singdana peanut raita dip recipe.
If you like making dahi at home, this Instant Pot yogurt (pot-in-pot method) is the one referenced for thick curd.
Shaping sabudana thalipeeth two ways (cloth and parchment)
Shaping is where many thalipeeth attempts go wrong, mostly because the mixture sticks to hands or breaks while transferring. Two easy surfaces solve that: a damp cloth (malmal or muslin) or parchment paper (plastic sheet also works). Both let you flatten the patty evenly, then flip it onto the tawa with control.
Method 1: On a damp malmal cloth (muslin) Spread the cloth and sprinkle a little water on it. This thin moisture layer stops sticking. Take a small portion of mixture (about 1 to 2 tablespoons), press it into a ball, then place it on the cloth. Use your fingers to press and spread it into a round.
If the edges crack while pressing, don't worry. Just patch it back together with your fingers. This mixture is forgiving once the sabudana and potato are mixed well.
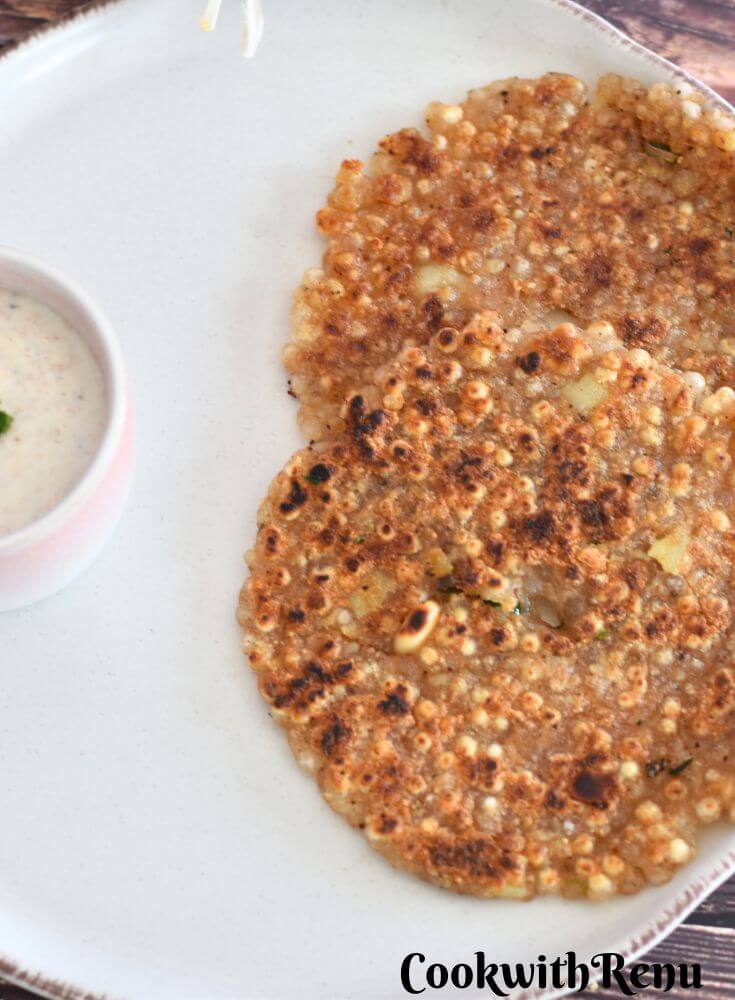
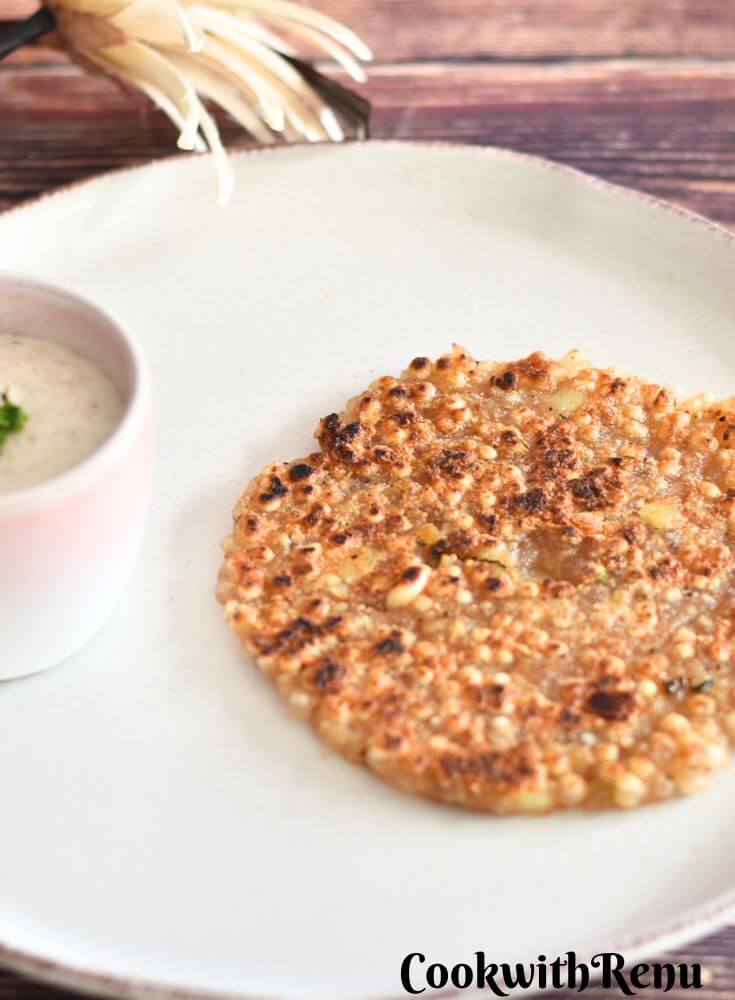
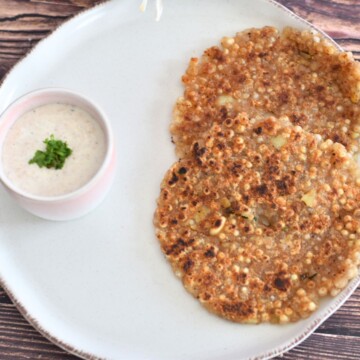
Next, make a small hole in the center with your finger. That hole is not decoration. It helps the inside cook through, and it gives you a place to add a little ghee while cooking.
Method 2: On parchment paper (or a plastic sheet) Place the pressed ball on parchment paper. Lightly wet your fingers, then flatten and shape it. Wet fingers make spreading easier and keep the mixture from clinging to your skin. Make the same center hole.
Both methods work well. The cloth method feels more traditional and easy to flip in one motion. The parchment method is neat and simple, especially if you're nervous about lifting a soft patty.
Cooking on a tawa for that golden crust (without burning)
Cooking is where texture is decided. The heat must stay medium. If the pan gets too hot, the outside browns too fast while the inside stays undercooked. Medium heat gives the sabudana time to set, then crisp up.
Use a nonstick tawa if you have one, and heat it to medium-hot. Add a little ghee and spread it around.
- Transfer the shaped thalipeeth onto the tawa by flipping the cloth or parchment paper surface-side down onto the pan.
- Let it cook for 2 to 3 minutes without moving it. This is important because the patty needs time to set before you try sliding or lifting it.
- Once it starts to look set and slightly dry on top, drizzle a little ghee around the edges and a bit into the center hole.
- Press gently with a spatula, then let it cook while you slowly slide it a little so it browns evenly.
- When the bottom turns golden and releases easily, flip it. Use a spoon or spatula to help if needed.
- Add a little ghee on the second side, press gently again, and cook until golden.
That center hole does real work here. It helps heat reach the middle, and it lets ghee flow inward so the thalipeeth cooks from the center out. The end result is exactly what you want: crisp outside, soft inside, and no raw bite in the middle.
Keep the flame on medium and don't rush the first side. Once the base sets, flipping becomes easy.
Cook the remaining mixture the same way, shaping each thalipeeth right before it goes on the pan. Serve them as they come off the tawa because the crisp texture is best when hot.
Serving ideas and vrat-friendly notes
Serve sabudana thalipeeth hot, straight from the tawa. Spoon the singdane raita into a small bowl and plate it alongside. That combination hits the sweet spot during a fast because it feels filling, comforting, and not too heavy.
If you like, finish with a little extra lemon on top. Even a small squeeze wakes up the peanut flavor and balances the richness from ghee.
This is a great option for fasting days such as Mahashivaratri, Navratri, and Janmashtami, and it also works as an anytime snack when you want something quick but satisfying.
Sabudana Thalipeeth (Vrat) Crispy Outside, Soft Inside
 Print
Pin
Rate
Save
Print
Pin
Rate
Save
Equipment
- Muslin Cloth or Parchment Paper
Ingredients
For Method 1
- 2 medium-sized Potato Raw
For Method 2
- 2 medium-sized Potato Raw
For Methods 1 & 2
- 1 Cup Sabudana
- ¼ Cup Peanuts Roasted and coarsely ground.
- ½ teaspoon lemon juice
- ¼ teaspoon sugar
- 2 green chillies chopped as per taste
- 1 tablespoon Coriander chopped
- Salt
- 2 tabespoon Ghee Can be replaced with oil
Instructions
Soaking Sabudana
- Rinse the sabudana 2-3 times in water.
- Add ¼ Cup + 2 tablespoon water in it and let it soak for 5-6 hours or overnight.
- Water should be just enough. When you soak, a line above the sabudana should be visible.
Method 1
- Lightly crush the sabudana in a mixer. Do not make a paste, we still want some round granules. Just give it a churn for 1 or 2 rounds for 3-4 secs. that's it.
- Grate the potato. Yes its not boiled. Just grate it.
- Mix everything.
- Heat a non-stick tawa.
- Apply a little ghee in your hand, take a portion of sabudana and flatten it to make a thalipeeth.
- For making thalipeeth, one can use a wet cloth or parchment paper.
- Flip the thalipeeth on the medium hot pan.
- Cook it on a medium stove using ghee.
- Yummy Sabudana Thalippeth are ready to serve.
Method 2
- Add the soaked sabudana, potato, peanuts , salt, lemon juice, Sugar and green chillies.
- Crush the potatoes well so that there is not big pieces in it.
- Mix all the ingredients well.
- Heat a cast iron pan.
- Take 2-3 tablespoon of sabudana mixture and make a ball of it.
- Flatten a muslin cloth and sprinkle some water on it.
- Dip your fingers in water, and flatten the thalipeeth on this cloth.
- Make a hole in the center.
- One can use parchment paper to make the thalipeeth.
- Cook it on a medium stove, using ghee.
- Yummy Sabudana pancake or Sabudana fritters are ready to serve.
Video
Notes
- Try to maintain the ratio of Sabudana and Potato.
- If your thalipeeth breaks a lot while making thalipeeth, it means either it has not soaked properly, or you have added less potato.
- If you follow the above ratio, it should be good.
- Check this video on how to peel peanuts if required.
Sharing this with
#Foodies_RedoingOldPost_171

Tried this recipe? Please comment and rate the recipe. Share your pics and tag us.
Subscribe to my email list to get the new recipes straight into your mailbox.
Superlike....my baby is very choosy but she liked the dish a lot...��������
Thank you Bhavana
A superb healthy version of the sabudana vada. A good share with the festivities approaching.
Ooo, love the charred portions!! A healthy twist to the deep fried sabudana vada! Nice dish!
Love the sabudana Chilka, perfect for an evening snack with a hot cuppa!
Love sabudana vada but I too don’t make them too frequent as they are deep fries these sabudana pancakes sounds interesting and a healthy choice.
Definitely a healthy version of sabudana vada, I make them in appe pan but pancake is also a great idea.....will be very useful for Navratri...Awesome share!!
I yet to try sabudana pancake, sounds so delicious and easy to prepare. Perfect for a fasting season.
Sabudana pancakes look absolutely delicious and tempting. This very new recipe for me. Will give a try making this dish.
Love this one Renu, its yumm, does adding raw potato give different taste ? Is it well cooked on roasting, I usually add boiled potato.
Sabudana pancake always sounds so delicious as well as easy to prepare.
Perfect for current fasting days 🙂
Sabudana thalipeeth is my all time favourite among the fasting recipes. Loved the way you have given two ways of making it. I always make it with boiled potatoes..next time will try your method.
This sabudana pancakes looks so good....plus the two ways you suggested to make this awesome...
Sabudana Pancake is such an interesting recipe. I never thought you could make it with raw grated potato. I will definitely try.
sabudana pancake is loved by all. I am amazed how sabudana adds flavors to everything. Looks tempting.
A nice way to not eat something fried on a fasting day. I made it recently and turned out delicious.